Building a Body
aurellem ☉
1 Design Constraints
I use blender to design bodies. The design of the bodies is determined by the requirements of the AI that will use them. The bodies must be easy for an AI to sense and control, and they must be relatively simple for jMonkeyEngine to compute.
1.1 Bag of Bones
How to create such a body? One option I ultimately rejected is to use blender's armature system. The idea would have been to define a mesh which describes the creature's entire body. To this you add an skeleton which deforms this mesh. This technique is used extensively to model humans and create realistic animations. It is hard to use for my purposes because it is difficult to update the creature's Physics Collision Mesh in tandem with its Geometric Mesh under the influence of the armature. Without this the creature will not be able to grab things in its environment, and it won't be able to tell where its physical body is by using its eyes. Also, armatures do not specify any rotational limits for a joint, making it hard to model elbows, shoulders, etc.
1.2 EVE
Instead of using the human-like "deformable bag of bones" approach, I decided to base my body plans on the robot EVE from the movie wall-E.

Figure 1: EVE from the movie WALL-E. This body plan turns out to be much better suited to my purposes than a more human-like one.
EVE's body is composed of several rigid components that are held together by invisible joint constraints. This is what I mean by "eve-like". The main reason that I use eve-style bodies is so that there will be correspondence between the AI's vision and the physical presence of its body. Each individual section is simulated by a separate rigid body that corresponds exactly with its visual representation and does not change. Sections are connected by invisible joints that are well supported in jMonkeyEngine. Bullet, the physics backend for jMonkeyEngine, can efficiently simulate hundreds of rigid bodies connected by joints. Sections do not have to stay as one piece forever; they can be dynamically replaced with multiple sections to simulate splitting in two. This could be used to simulate retractable claws or EVE's hands, which are able to coalesce into one object in the movie.
2 Solidifying the Body
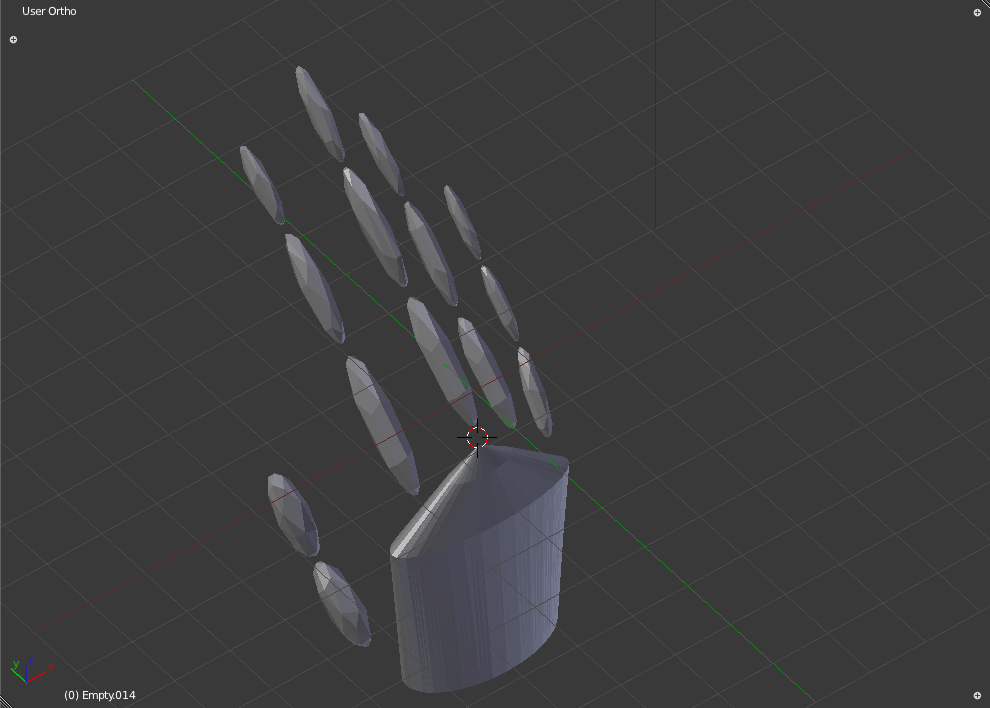
Here is a hand designed eve-style in blender.
If we load it directly into jMonkeyEngine, we get this:
(def hand-path "Models/test-creature/hand.blend")

(defn hand [] (load-blender-model hand-path))

(defn setup [world]
  (let [cam (.getCamera world)]
    (println-repl cam)
    (.setLocation
     cam (Vector3f.
          -6.9015837, 8.644911, 5.6043186))
    (.setRotation
     cam
     (Quaternion.
      0.14046453, 0.85894054, -0.34301838, 0.3533118)))
  (light-up-everything world)
  (.setTimer world (RatchetTimer. 60))
  world)

(defn test-hand-1
  ([] (test-hand-1 false))
  ([record?]
     (world (hand)
            standard-debug-controls
            (fn [world]
              (if record?
                (Capture/captureVideo
                 world
                 (File. "/home/r/proj/cortex/render/body/1")))
             (setup world)) no-op)))
(.start (cortex.test.body/test-one))
YouTube
The hand model directly loaded from blender. It has no physical presence in the simulation.
You will notice that the hand has no physical presence – it's a hologram through which everything passes. Therefore, the first thing to do is to make it solid. Blender has physics simulation on par with jMonkeyEngine (they both use bullet as their physics backend), but it can be difficult to translate between the two systems, so for now I specify the mass of each object as meta-data in blender and construct the physics shape based on the mesh in jMonkeyEngine.
(defn physical!
  "Iterate through the nodes in creature and make them real physical
   objects in the simulation."
  [#^Node creature]
  (dorun
   (map
    (fn [geom]
      (let [physics-control
            (RigidBodyControl.
             (HullCollisionShape.
              (.getMesh geom))
             (if-let [mass (meta-data geom "mass")]
               (do
                 ;;(println-repl
                 ;; "setting" (.getName geom) "mass to" (float mass))
                 (float mass))
               (float 1)))]
        (.addControl geom physics-control)))
    (filter #(isa? (class %) Geometry )
            (node-seq creature)))))
physical! iterates through a creature's node structure, creating
CollisionShapes for each geometry with the mass specified in that
geometry's meta-data.
(in-ns 'cortex.test.body)

(def gravity-control
  {"key-g" (fn [world _]
             (set-gravity world (Vector3f. 0 -9.81 0)))
   "key-u" (fn [world _] (set-gravity world Vector3f/ZERO))})

(defn floor []
  (box 10 3 10 :position (Vector3f. 0 -10 0)
       :color ColorRGBA/Gray :mass 0))

(defn test-hand-2
  ([] (test-hand-2 false))
  ([record?]
     (world
      (nodify
       [(doto (hand)
          (physical!))
        (floor)])
      (merge standard-debug-controls gravity-control)
      (fn [world]
        (if record?
          (Capture/captureVideo
           world (File. "/home/r/proj/cortex/render/body/2")))
        (set-gravity world Vector3f/ZERO)
        (setup world))
      no-op)))
YouTube
The hand now has a physical presence, but there is nothing to hold it together.
Now that's some progress.
3 Joints
Obviously, an AI is not going to be doing much while lying in pieces on the floor. So, the next step to making a proper body is to connect those pieces together with joints. jMonkeyEngine has a large array of joints available via bullet, such as Point2Point, Cone, Hinge, and a generic Six Degree of Freedom joint, with or without spring restitution.
Although it should be possible to specify the joints using blender's physics system, and then automatically import them with jMonkeyEngine, the support isn't there yet, and there are a few problems with bullet itself that need to be solved before it can happen.
So, I will use the same system for specifying joints as I will do for some senses. Each joint is specified by an empty node whose parent has the name "joints". Their orientation and meta-data determine what joint is created.
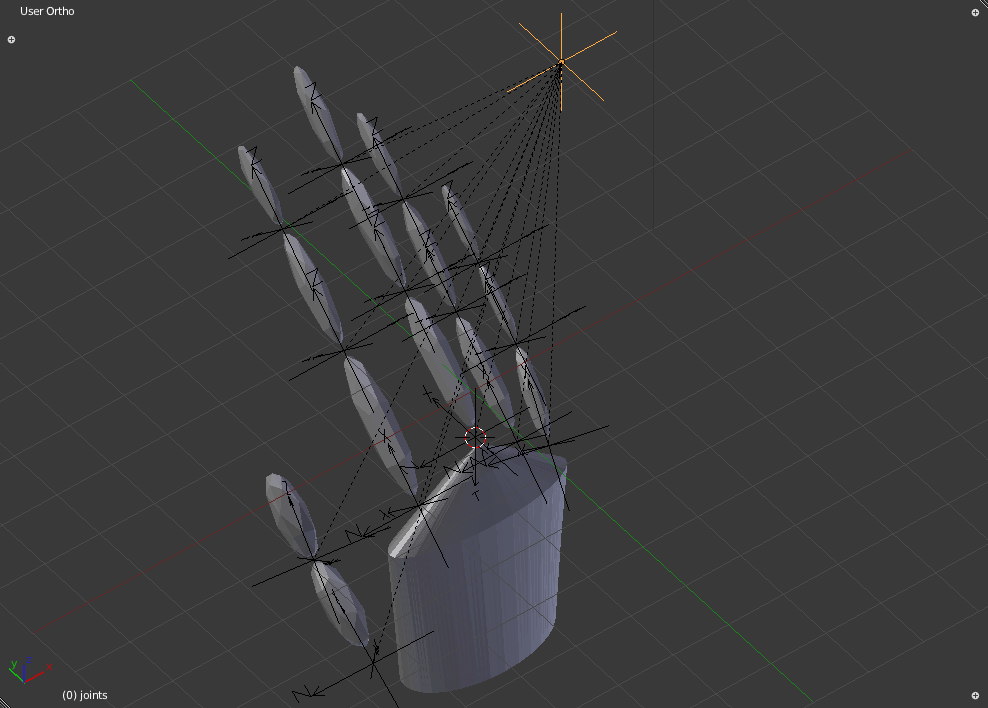
Figure 3: Joints hack in blender. Each empty node here will be transformed into a joint in jMonkeyEngine
The empty node in the upper right, highlighted in yellow, is the parent node of all the empties which represent joints. The following functions must do three things to translate these into real joints:
- Find the children of the "joints" node.
- Determine the two spatials the joint is meant to connect.
- Create the joint based on the meta-data of the empty node.
3.1 Finding the Joints
The higher order function sense-nodes from cortex.sense simplifies
the first task.
(def
  ^{:doc "Return the children of the creature's \"joints\" node."
    :arglists '([creature])}
  joints
  (sense-nodes "joints"))
3.2 Joint Targets and Orientation
This technique for finding a joint's targets is very similar to
cortex.sense/closest-node. A small cube, centered around the
empty-node, grows exponentially until it intersects two physical
objects. The objects are ordered according to the joint's rotation,
with the first one being the object that has more negative coordinates
in the joint's reference frame. Since the objects must be physical,
the empty-node itself escapes detection. Because the objects must be
physical, joint-targets must be called after physical! is
called.
(defn joint-targets
  "Return the two closest two objects to the joint object, ordered
  from bottom to top according to the joint's rotation."
  [#^Node parts #^Node joint]
  (loop [radius (float 0.01)]
    (let [results (CollisionResults.)]
      (.collideWith
       parts
       (BoundingBox. (.getWorldTranslation joint)
                     radius radius radius) results)
      (let [targets
            (distinct
             (map  #(.getGeometry %) results))]
        (if (>= (count targets) 2)
          (sort-by
           #(let [joint-ref-frame-position
                  (jme-to-blender
                   (.mult
                    (.inverse (.getWorldRotation joint))
                    (.subtract (.getWorldTranslation %)
                               (.getWorldTranslation joint))))]
              (.dot (Vector3f. 1 1 1) joint-ref-frame-position))
           (take 2 targets))
          (recur (float (* radius 2))))))))
3.3 Generating Joints
This section of code iterates through all the different ways of specifying joints using blender meta-data and converts each one to the appropriate jMonkeyEngine joint.
(defmulti joint-dispatch
  "Translate blender pseudo-joints into real JME joints."
  (fn [constraints & _]
    (:type constraints)))

(defmethod joint-dispatch :point
  [constraints control-a control-b pivot-a pivot-b rotation]
  ;;(println-repl "creating POINT2POINT joint")
  ;; bullet's point2point joints are BROKEN, so we must use the
  ;; generic 6DOF joint instead of an actual Point2Point joint!

  ;; should be able to do this:
  (comment
    (Point2PointJoint.
     control-a
     control-b
     pivot-a
     pivot-b))

  ;; but instead we must do this:
  ;;(println-repl "substituting 6DOF joint for POINT2POINT joint!")
  (doto
      (SixDofJoint.
       control-a
       control-b
       pivot-a
       pivot-b
       false)
    (.setLinearLowerLimit Vector3f/ZERO)
    (.setLinearUpperLimit Vector3f/ZERO)))

(defmethod joint-dispatch :hinge
  [constraints control-a control-b pivot-a pivot-b rotation]
  ;;(println-repl "creating HINGE joint")
  (let [axis
        (if-let
            [axis (:axis constraints)]
          axis
          Vector3f/UNIT_X)
        [limit-1 limit-2] (:limit constraints)
        hinge-axis
        (.mult
         rotation
         (blender-to-jme axis))]
    (doto
        (HingeJoint.
         control-a
         control-b
         pivot-a
         pivot-b
         hinge-axis
         hinge-axis)
      (.setLimit limit-1 limit-2))))

(defmethod joint-dispatch :cone
  [constraints control-a control-b pivot-a pivot-b rotation]
  (let [limit-xz (:limit-xz constraints)
        limit-xy (:limit-xy constraints)
        twist    (:twist constraints)]

    ;;(println-repl "creating CONE joint")
    ;;(println-repl rotation)
    ;;(println-repl
    ;; "UNIT_X --> " (.mult rotation (Vector3f. 1 0 0)))
    ;;(println-repl
    ;; "UNIT_Y --> " (.mult rotation (Vector3f. 0 1 0)))
    ;;(println-repl
    ;; "UNIT_Z --> " (.mult rotation (Vector3f. 0 0 1)))
    (doto
        (ConeJoint.
         control-a
         control-b
         pivot-a
         pivot-b
         rotation
         rotation)
      (.setLimit (float limit-xz)
                 (float limit-xy)
                 (float twist)))))

(defn connect
  "Create a joint between 'obj-a and 'obj-b at the location of
  'joint. The type of joint is determined by the metadata on 'joint.

   Here are some examples:
   {:type :point}
   {:type :hinge  :limit [0 (/ Math/PI 2)] :axis (Vector3f. 0 1 0)}
   (:axis defaults to (Vector3f. 1 0 0) if not provided for hinge joints)

   {:type :cone :limit-xz 0]
                :limit-xy 0]
                :twist 0]}   (use XZY rotation mode in blender!)"
  [#^Node obj-a #^Node obj-b #^Node joint]
  (let [control-a (.getControl obj-a RigidBodyControl)
        control-b (.getControl obj-b RigidBodyControl)
        joint-center (.getWorldTranslation joint)
        joint-rotation (.toRotationMatrix (.getWorldRotation joint))
        pivot-a (world-to-local obj-a joint-center)
        pivot-b (world-to-local obj-b joint-center)]

    (if-let [constraints
             (map-vals
              eval
              (read-string
               (meta-data joint "joint")))]
      ;; A side-effect of creating a joint registers
      ;; it with both physics objects which in turn
      ;; will register the joint with the physics system
      ;; when the simulation is started.
      (do
        ;;(println-repl "creating joint between"
        ;;              (.getName obj-a) "and" (.getName obj-b))
        (joint-dispatch constraints
                        control-a control-b
                        pivot-a pivot-b
                        joint-rotation))
      ;;(println-repl "could not find joint meta-data!")
      )))
Creating joints is now a matter of applying connect to each joint
node.
(defn joints!
  "Connect the solid parts of the creature with physical joints. The
   joints are taken from the \"joints\" node in the creature."
  [#^Node creature]
  (dorun
   (map
    (fn [joint]
      (let [[obj-a obj-b] (joint-targets creature joint)]
        (connect obj-a obj-b joint)))
    (joints creature))))
3.4 Round 3
Now we can test the hand in all its glory.
(in-ns 'cortex.test.body)

(def debug-control
  {"key-h" (fn [world val]
             (if val (enable-debug world)))})

(defn test-hand-3
  ([] (test-hand-3 false))
  ([record?]
     (world
      (nodify
       [(doto (hand)
          (physical!)
          (joints!))
        (floor)])
      (merge standard-debug-controls debug-control
             gravity-control)
      (comp
       #(Capture/captureVideo
         % (File. "/home/r/proj/cortex/render/body/3"))
       #(do (set-gravity % Vector3f/ZERO) %)
       setup)
      no-op)))
physical! makes the hand solid, then joints! connects each
piece together.
YouTube
Now the hand is physical and has joints.
The joints are visualized as green connections between each segment for debug purposes. You can see that they correspond to the empty nodes in the blender file.
4 Wrap-Up!
It is convenient to combine physical! and joints! into one
function that completely creates the creature's physical body.
(defn body!
  "Endow the creature with a physical body connected with joints.  The
   particulars of the joints and the masses of each body part are
   determined in blender."
  [#^Node creature]
  (physical! creature)
  (joints! creature))
5 The Worm
Going forward, I will use a model that is less complicated than the hand. It has two segments and one joint, and I call it the worm. All of the senses described in the following posts will be applied to this worm.
(in-ns 'cortex.test.body)

(defn worm []
 (load-blender-model
            "Models/test-creature/worm.blend"))

(defn test-worm

  "Testing physical bodies:
   You should see the the worm fall onto a table. You can fire
   physical balls at it and the worm should move upon being struck.

   Keys:
     <space> : fire cannon ball."

  ([] (test-worm false))
  ([record?]
     (let [timer (RatchetTimer. 60)]
       (world
        (nodify
         [(doto (worm)
            (body!))
          (floor)])
        (merge standard-debug-controls debug-control)
        #(do
           (speed-up %)
           (light-up-everything %)
           (.setTimer % timer)
           (cortex.util/display-dilated-time % timer)
           (if record?
             (Capture/captureVideo
              % (File. "/home/r/proj/cortex/render/body/4"))))
        no-op))))
YouTube
This worm model will be the platform onto which future senses will be grafted.
6 Headers
(ns cortex.body
  "Assemble a physical creature using the definitions found in a
   specially prepared blender file. Creates rigid bodies and joints so
   that a creature can have a physical presence in the simulation."
  {:author "Robert McIntyre"}
  (:use (cortex world util sense))
  (:import
   (com.jme3.math Vector3f Quaternion Vector2f Matrix3f)
   (com.jme3.bullet.joints
    SixDofJoint Point2PointJoint HingeJoint ConeJoint)
   com.jme3.bullet.control.RigidBodyControl
   com.jme3.collision.CollisionResults
   com.jme3.bounding.BoundingBox
   com.jme3.scene.Node
   com.jme3.scene.Geometry
   com.jme3.bullet.collision.shapes.HullCollisionShape))
(ns cortex.test.body
  (:use (cortex world util body))
  (:import
   (com.aurellem.capture Capture RatchetTimer IsoTimer)
   (com.jme3.math Quaternion Vector3f ColorRGBA)
   java.io.File))
7 Source
8 Next
The body I have made here exists without any senses or effectors. In the next post, I'll give the creature eyes.